There are two ways for a staff member to open a CnC order: reserve the order, and then to start the picking.
Retail messages
Staff members can open a message that has a CnC action attached to it. When the message is processed, it takes the staff member straight to the order and he or she can start working on it right away.
Picking list
The Picking list is a list of COs that have not yet been picked. If an order in the list is selected and the Pick button is pressed, the CO opens in a new panel (same panes as the ones opened by Retail Message).
The Picking List on the POS:
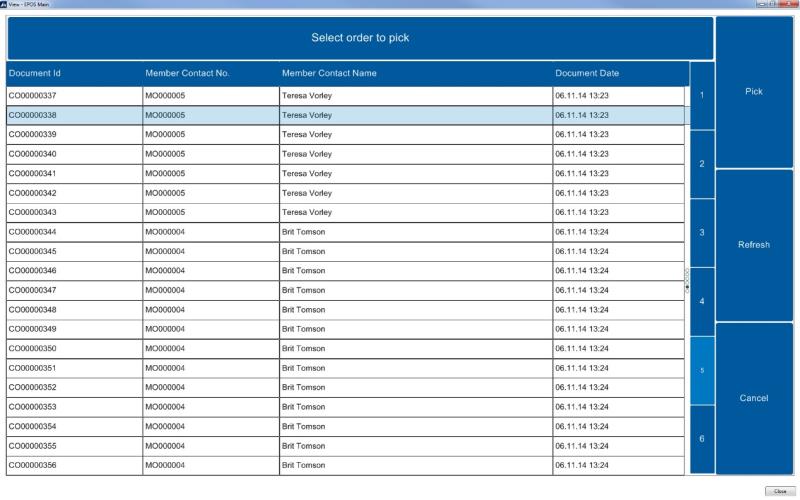
The selected line is the CO that will be opened by pressing the Pick button. A new panel opens with the lines representing each item in the selected CO. Each line always has Quantity equal to one (1) so each item can be scanned on the POS after or during the picking of the items.
A CO ready for Picking:

The lines in this panel represent each item that has to be picked. Items can be marked in three ways:
- Each line marked individually by using the Mark button for each line.
- All lines can be marked at the same time using the Mark All button.
- Items can be scanned on the POS.
The Customer Orders panel contains a set of buttons that can be used to perform various tasks in the picking process. These buttons and their functionality are listed here:
- Confirm: Confirms the picking of the order. Picked lines will get the status To Collect and unpicked lines will get the status Shortage.
- Mark: With a line selected, this button marks the item as Picked after Confirm.
- Mark all: This marks all items in the CO as Picked after Confirm.
- Reset Selection: This unmarks all items that were previously marked.
- Print Slip: Prints out the Picking Slip that the staff member uses to pick all of the items in the order from the store and into the bag that the customer will then collect.
- Put on Hold: Leave the process of picking the order but keep the order reserved. This is done so that the staff member can be sure that no other staff member opens the order and starts working on it while he closes it. The order will keep the status In process and the only way to continue to work on it is either if the staff member that put it on hold reopens it or by using the Unlock Order action in Back Office.
- Shortage: All lines will get the status Shortage and the order is posted.
- Cancel: Cancel the picking process.
When the CO opens for Picking, the staff member prints out a Picking List using the PRINT_SL POS command. The Picking List contains information about the order and all items belonging to it.
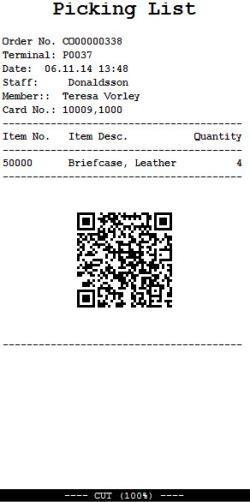
With the Picking List slip in hand the staff member puts the order on hold and picks up the items that belong to the order from the store floor.
The Picking List slip contains a QR code that contains the CO number. The staff member will then scan the QR code to open up the order that he had previously Put on Hold.
Next the staff member scans the items and puts them in some kind of a container e.g. a bag.
In case of shortage not all lines are picked. Then when the Confirm button is pressed the following confirmation window appears:

If the user confirms this message, all picked lines get the status To Collect and the unavailable items get the status Shortage.
If the option to use Collect Location is turned on in the CO setup, a keyboard is prompted at this point and the staff member can write (free text) the collect location of the order in the store (for example, "At Terminal 4, behind reception desk").


After the location has been typed in and Enter pressed, a Collection Slip is printed and should be attached to the CnC goods container.