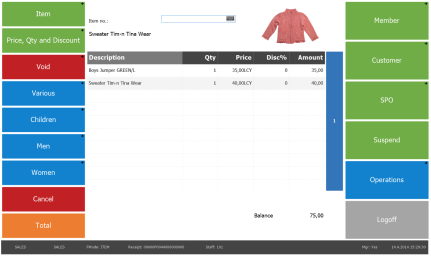
The functionality to swipe panel to the left or right is an option for the POS user in order to view another window; that is to swipe to the left and right panel.
This makes it possible for the POS user to have access to “another window” either to the left or right of the #POS and the #OFFLINE panels.
The main objective for the Swipe Panel in this version is the following:
- Used for panels #POS and #OFFLINE
- Intended to display information about the sale
The following picture explains the idea with the Left and Right panel in the POS:
|
Left Panel |
|
Right Panel |
The Demo Data Company has two new special panels, #SW-MEMBER-CUSTOMER and #SW-TRANS-LINE-INFO, to be used as an example of the Left and Right panels.
More information about these two panels can be found in the following.
Setting up the Swipe Panel Functionality
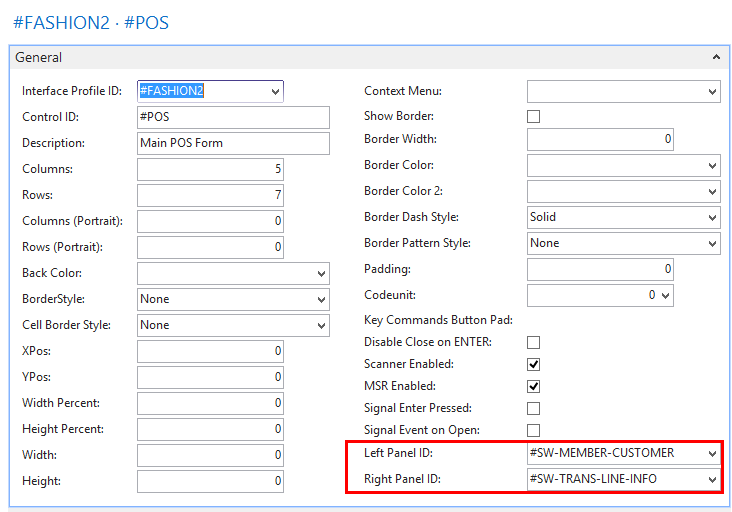
On the Panel Card there are two fields that need to be filled out for swiping: Left Panel ID and Right Panel ID.
| Field name | Description |
|---|---|
| Left Panel ID | Panel ID to swipe to the Left with feature Swipe Panel |
| Right Panel ID | Panel ID to swipe to the Right with feature Swipe Panel |
How to swipe to the Left and Right Panels
The POS user can use one of the following methods to swipe to the left and right panels.
- On a touch screen: Swipe to left or right direction on the POS screen.
- With the keyboard: Use keyboard buttons Alt + ← or Alt + →
- With the mouse: Use the mouse to drag the display to the left or right.
- Pressing buttons: Configure POS Commands SWIPE_LEFT or SWIPE_RIGHT for a button and press it.
Note: For a POS user to access the right and left panels, a valid panel ID has to be set into the corresponding fields for the panel in which the user is active.
It is not possible to swipe on a part of the screen that contains a browser control, media control or includes HTML information.
Left Swipe Panel
Objectives for the Left Panel:
- Displaying information beneficial for he POS user about the member/customer of the sale
- Helping the POS user to give better service to the customer with the aim to increase sales
- Displaying information for the sale‘s member account/contact and customer
- When no customer or member is in the sale display, general information as much as possible/available
To do this a panel with the ID #SW-MEMBER-CUSTOMER has been created in the LS Nav Demo Data Company.
Tip: This panel is an example of how the swipe panel can be used.
Panel #SW-MEMBER-CUSTOMER:
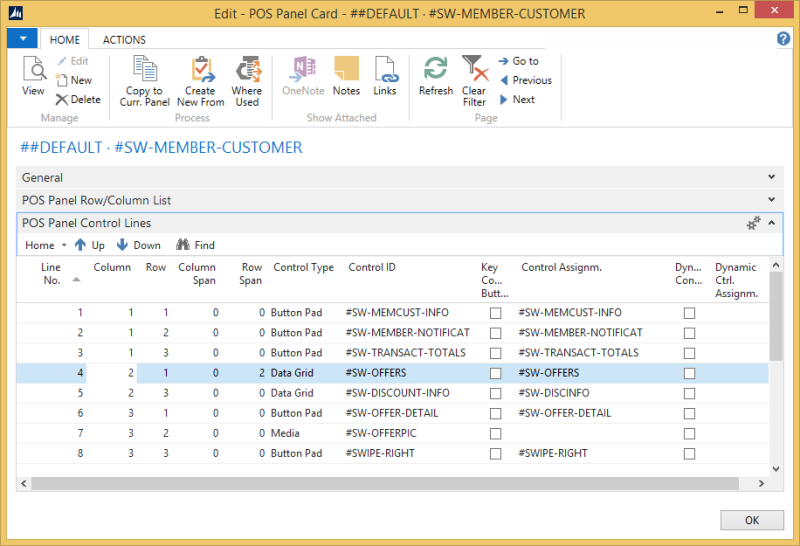
For the information to be displayed in this panel the panel is running its own codeunit with ID 99001596, POS Member/Customer Info Panel
This panel includes some lines with control types Button Pad, Data Grid and Media as described below.
Note: The controls in this panel have fixed names.
| Control ID | Control Type | Information - Description |
|---|---|---|
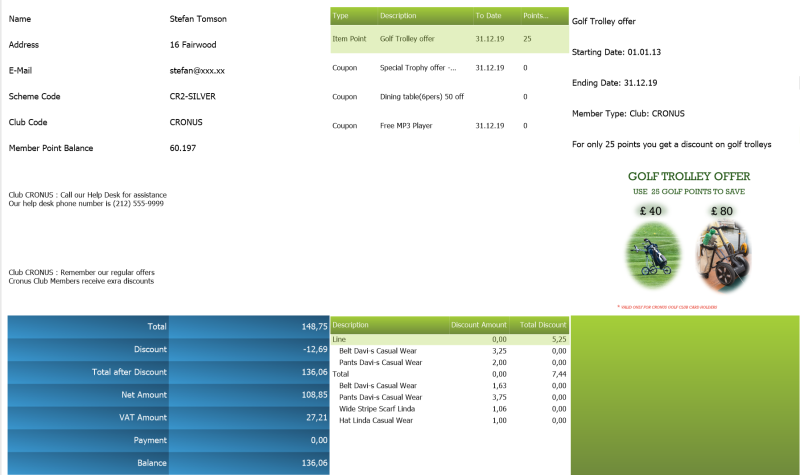
| #SW-MEMCUST-INFO | Button Pad | Includes few fields with information about the member or customer that is registered in the active sale. The displayed information is: For the Member: Name, Address (the first line), E-Mail address, Scheme, Club. Member point Balance For the Customer: Name, Address(the first line), E-Mail address |
| #SW-MEMBER-NOTIFICAT | Button Pad | List of notifications belonging to the member of the sale. These can be Account-, Contact-, Club- or Scheme-specific. The newest notification is displayed at the top of the list |
| #SW-TRANSACT-TOTALS | Button Pad | Some totals for the sale |
| #SW-OFFERS | Data Grid | List of offers that are valid for the sale |
| #SW-DISCOUNT-INFO | Data Grid | Displays the items in the sale that have a discount. The discount is displayed in amount. The discount is grouped into two groups for the Lines and Total |
| #SW-OFFER-DETAIL | Button Pad | Details of the selected offer in the #SW-OFFERS part |
| #SW-OFFERPIC | Media | Image for the selected offer in the #SW-OFFERS part |
Note: For the relevant parts of this panels, when a customer is registered to the sale, valid information about him is displayed, the same applies to a member registered to the sale. When no member or customer are in the sale, the fields relevant to this are empty or display a message: No Member /Customer information available.
Example displaying the Panel #SW-MEMBER-CUSTOM:
Right Swipe Panel
Objectives for the Right Panel:
- For the POS user to get additional information about items to help him with the item sale
- More Information - Increase of Sale - Better service to customer
- Used from two panels: #POS and #OFFLINE
- In #POS Panel display information of the active item
- In #OFFLINE Panel display information for an item which is selected
To do this, a panel with the ID #SW-TRANS-LINE-INF has been created in the LS Nav Demo Data Company.
Tip: This panel is an example of how the swipe panel can be used.
Panel #SW-TRANS-LINE-INF:
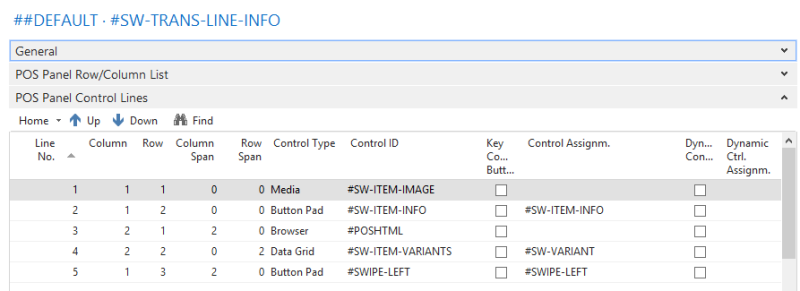
Note: For the information to be displayed in this panel, the panel is running its own codeunit 99001597, POS Trans. Line Info Panel.
This panel includes some lines that have the control types Button Pad, Data Grid and Media as described below.
These controls have fixed names.
| Control ID | Control Type | Information - Description |
|---|---|---|
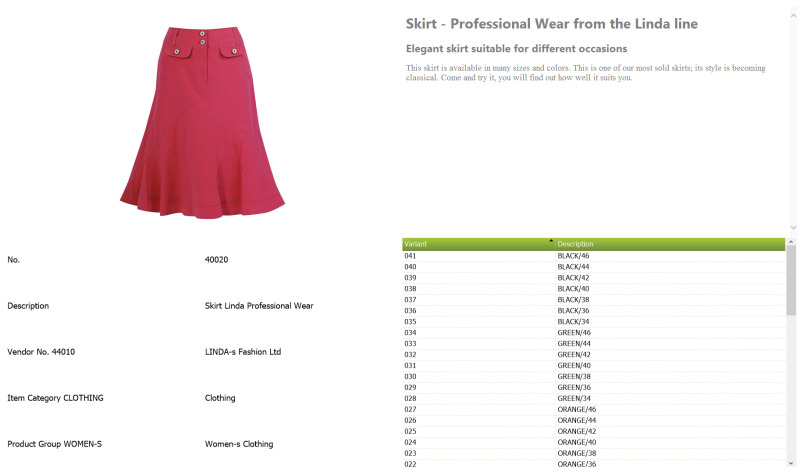
| #SW-ITEM-IMAGE | Media | Image of the item in the active Journal Line |
| #SW-ITEM-INFO | Button Pad | Displays information on the active item’s number, description, vendor, item category and product group |
| #POSHTML | Browser | HTML information of the active item |
| #SW-ITEM-VARIANTS | Data Grid | List of the item’s defined variants |
Note: This panel displays available information about the active item in the sale.
This panel uses the #POSHTML browser, the code unit set for the panel makes sure to display the correct image belonging to the item in the active sales line.
Example displaying the Panel #SW-TRANS-LINE-INF:
