Retail Item Printing is functionality for label printing and extra printing.
Labels are generated by using actions (or preactions if used for replication). The system scans the Action table for any data changes that require new labels to be printed.
The system contains information about all labels needed in the future. Therefore you can order labels for both the beginning date of a periodic offer and at the ending date.
Label orders are specific to each store, item, variant and unit of measure. New labels to print should be created on:
- Price change
- Comp. price change
- Description change (item or variant)
- Barcode change ( the one on the retail item card )
- Label report change
- New variant added
- New unit of measure is marked to be printed
The label reports in the system are for reference. If the item price is higher than 100.000 you need to modify the report.
The Extra Print Setup allows defining extra print texts like a warranty card or item care instructions. These texts can be assigned to items for printing on the OPOS POS printer.
Label printing, basic definitions
Basic definitions for ordering and printing of labels are found at some places in LS Retail.
- Retail Setup, Labels tab
- Store Card, General tab
- Retail Item Card, General tab
- Item Unit of Measure Card
Item and shelf label reports
In order to print labels, you need to define and specify reports. The label reports in the demo system are for reference. If the item price is higher than 100.000 you need to modify the report. For printing barcodes you need to have a barcode font. LS Retail does not provide you with any barcode fonts.
To set up shelf labels and assign reports
- Click LS Retail – BackOffice, Setup, Labels, Shelf Label Reports.
- Choose the label reports and assign a Label Code to them. This code is the reference used in the system.
- Specify the Report ID to define which report shall be used in order to print the label.
To set up Item labels and assign reports
- Click LS Retail – BackOffice, Setup, Labels, Item Label Reports.
- Choose the label reports and assign a Label Code to them. This code is the reference used in the system.
- Specify the Report ID to define which report should be used in order to print the label.
Shelf labels
Before printing shelf labels, you must assign shelf labels to retail items. When you assign shelf labels to items, you can set up which shelf label report you want to use to print shelf labels for individual items.
To assign shelf labels to Items
- Click LS Retail – Back Office, Retail Item Card, the Retail Item Card window appears.
- Browse to the item you want to assign a shelf label report to.
- Click Item, Text and Printing Setup, Shelf Label Setup.
- Fill in the Store Group field by selecting the relevant store group.
- Fill in the Label Code field.
- If you like to have a different label type for printing promotion labels, then you can select another label code in the field Red Flag Label Code.
- Fill in other fields as needed.
To print shelf labels
- Click LS Retail – Back Office, Labels, Shelf Label Print. The Shelf Label Printing window appears.
- Select a function to order labels.
-
Select the label code and print the label.
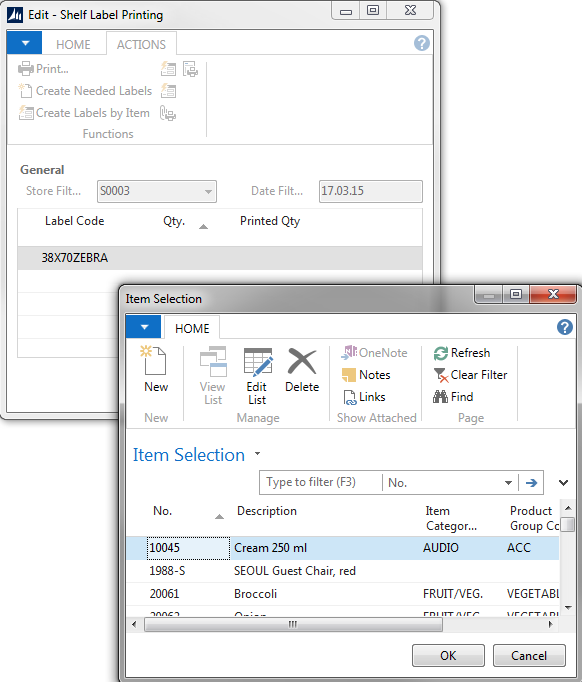
There are 4 functions for ordering labels:
- Create Needed Labels. Runs through the Action Table and checks if any data has changed that needs to be updated on a label.
- Create Shelf Labels by Item. Creates labels for items according to selected filter.
- Shelf Labels by Purch.doc. Creates labels from the lines by Purchase Document.
- Shelf Labels by Posted Purch.doc. Creates labels from the lines by posted Purchase Invoice.
Note: When opening the Shelf Label Printing window, the system will check for labels to be generated.
Item labels
Before printing item labels, you must assign item labels to retail items. When you assign item labels to items, you can set up which item label report you want to use to print item labels for individual items.
To assign item labels to Items
- Click LS Retail – BackOffice, Retail Item Card, the Retail Item Card window appears.
- Browse to the item you want to assign an item label report to.
- Click Item, Text and Printing Setup, Item Label Setup.
- Fill in the Store Group field by selecting the relevant store group.
- In the Label Code field select the relevant Label Code.
- Fill in the other fields on the Item Label Setup window as needed.
To print item labels
- Click LS Retail – Back Office, Labels, Item Label Print. The Item Label Printing window appears.
- Select a function to order labels.
- Select the label code and print the label.
There are 4 functions to order labels:
- Create Needed Item Labels. Runs through the Action Table and checks if any data has changed that needs to be updated on a label.
- Create Item Labels by Item. Creates labels for items according to selected filter.
- Item Labels by Purch.doc. Creates labels from the lines by not posted Purchase Document.
- Item Labels by Posted Purch.doc. Creates labels from the lines by posted
- Purchase Invoice.
Item labels can be printed directly from:
- A Retail Purchase Order
- A Store Posted Purchase Invoice.
Note: When opening the Item Label Printing window, the system will check for labels to be generated.
Label quick print from the Retail Item Card
Shelf and Item Labels can be printed straight from the Item Card. In both cases the system opens a form showing what will be printed after the setup on the item. You can modify the records, change the quantity, delete or add as you wish. To print, simply click Print and all labels on the form will be printed. Note: This can also be done from the Item Search card.
Extra prints
You can assign extra prints of receipts for given retail items. In order to assign extra prints you must first have to set up extra prints.
To assign Extra Print Setup to Retail Items:
- Click LS Retail – Back Office, Retail Item Card. The Retail Item Card window appears.
- Click Item, POS, Extra Print Setup. The Extra Print Setup window appears.
- Fill in the Setup ID field, by selecting an extra printout setup from the POS Print Setup List window.