For demo purposes, LS Retail provides three demo LS Forecast Dimensions, LSFCHASRAINRVK, LSFCMAXTEMPRVK, and LSFCMINTEMPRVK, which contain weather data in Reykjavik, Iceland.
You can also create your own LS Forecast Dimensions. LS Forecast needs the Dimension Entries data to be able to evaluate the effect of the dimensions on the historical sales data. You must decide how the LS Forecast Dimension Entries are obtained, that is if they are downloaded from external APIs or imported from files.
This page explains how you can extend LS Central's existing functionality to fit your requirements.
LS Central demo data lets you download a 5-day rain and temperature forecast from www.accuweather.com. You can create new dimensions using the prefixes LSFCHASRAIN, LSFCMAXTEMP, and LSFCMINTEMP for your preferred locations and cities. You can configure the new dimensions with the appropriate API URL, API Access Key, and API Parameter String, which let you download forecasts for a longer time period and for other cities or locations.
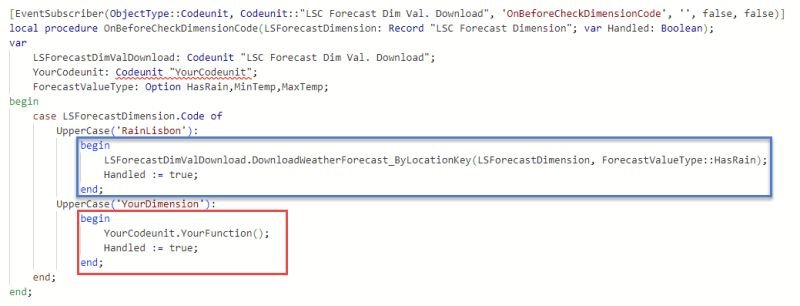
Alternatively, you can use a different API service provider. In that case, you need to change the code to call the function that is responsible for the download of dimension entries. The image shows two examples:
- The blue box demonstrates the scenario where you want to use an existing function provided by LS Central.
- The red box demonstrates the scenario where you want to use your own customized function.
We recommend that you automate the download of LS Forecast Dimension Entries for a specific LS Forecast Dimension using a Scheduler job:
- Click the
 icon, enter Scheduler Job List and select the relevant link.
 - Create a new Scheduler job by clicking the New action, or select an existing job.
- In the General FastTab, define the Job ID and Description.
- Select or create a new Scheduler Job Type Code.
- In the Object Setup FastTab, select Codeunit in the Object Type field and assign the Object No. with 10012234 (LSC Forecast Dim Val. Download).
- In the Object Setup FastTab, fill the Code field with the unique dimension code.
- Go to the Schedule Details FastTab, define the date and time when you would like the job to be executed. This includes Time Units, Time Between Check, Next Check Date, and Next Check Time.
See also
How to: Set Up LS Forecast Dimensions
How to: Set Up LS Forecast Dimension Entries