The support for Windows Authentication in Business Central is marked as OnPrem and cannot be accessed by cloud compliant apps. Therefore, LS Retail is forced to remove Windows Authentication for Web Services, the final step to make LS Central Universal Code Compliant by setting the Target to Cloud in the app.json file.
Web Services must use either Web Service Access Key or OAUth2 authentications.
- Web Service Access Key is only supported by service tiers where Credential Type is set to NavUserPassword.
- OAuth2 is only supported by service tiers where Credential Type is set to AccessControlService.
The most common way to authenticate normal users is to use Windows Authentication. This is still available by setting up a Service Tier where Client Credential Type is set to Windows.
In the following, the POS environment is the web service client and the Head Office is the web service server. It is the web service server that authenticates the web service client call.
Note: The POS environment can always be set up with a Service Tier Client Credential Type=Windows.
To set up a service tier that supports Web Service Access Key
If you are testing or developing and need to run a web service and want to use the Web Service Access Key, you must set up a service tier for the Head Office environment where Client Credential=NavUserPassword.
Update Service - Self-Service
- Create an environment using the Self-Service feature in Update Service for LS Central.
The service will be set up with a service tier where Client Credential=Windows. - Set up a second service tier by running the below script.
Before you run the script, replace the parameter for $ExistingInstanceName with the name of your existing service tier.
This will set up a second service tier where Client Credential=NavUserPassword.Copy$ErrorActionPreference = 'stop'
$ExistingInstanceName = 'Enter your existing instance name here'
$BcServer = Get-UscInstalledPackage -PackageId 'bc-server' -InstanceName $ExistingInstanceName
$Arguments = @{
"bc-server" = @{
ConnectionString = $BcServer.Info.ConnectionString
DeveloperServicesEnabled = 'true'
AllowForceSync = 'true'
ClientServicesCredentialType = 'NavUserPassword'
ServicesCertificateThumbprint = '${internal/self-signed-certificate-private.CertificateThumbprint}'
AllowSessionCallSuspendWhenWriteTransactionStarted = 'true'
NoDatabaseUpgrades = 'true'
PortSharing = 'true'
}
"bc-web-client" = @{
"DnsIdentity" = '${internal/self-signed-certificate-public.DnsIdentity}'
}
}
$Packages = @(
@{ Id = 'bc-server'; VersionQuery = $BcServer.Version}
@{ Id = 'bc-web-client'; VersionQuery = $BcServer.Version}
@{ Id = 'internal/self-signed-certificate-private'; VersionQuery = ''}
@{ Id = 'internal/self-signed-certificate-public'; VersionQuery = ''}
)
$Packages | Install-GocPackage -InstanceName 'Enter the new web service instance name here'- UpdateStrategy 'Manual' -Arguments $Arguments -UpdateInstance - Login with your Windows user name, and create a User with a Nav user password,
- Login as the Nav user, and copy the Web Service Access Key value.
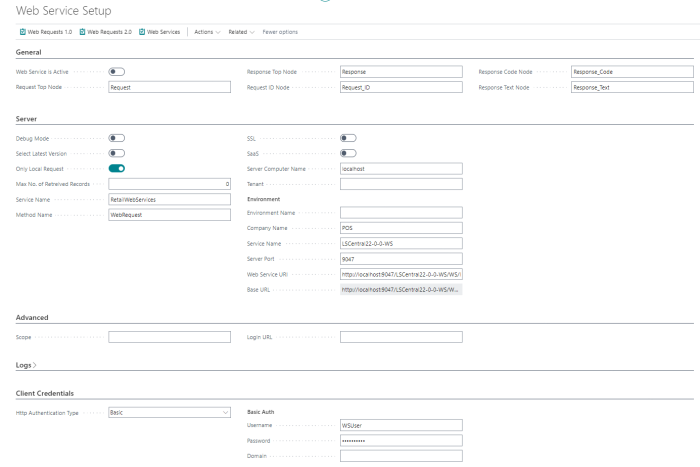
- In the Web Service Setup page in Head Office and Store:
- In the Server FastTab, set the Service Name to the instance name in the script.
- In the Client Credentials FastTab, set Http Authentication Type to Basic.
- Set the Username field to the name of the user that you created in step 3.
- In the Password field, paste the Web Service Access Key from step 4.
- Run Publisher and Subscriber.
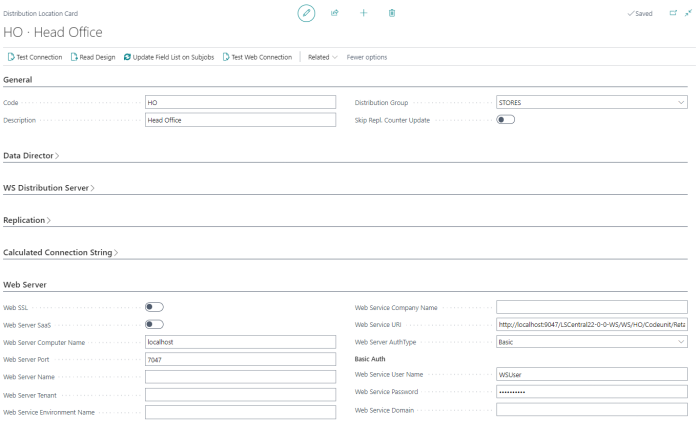
- In the Distribution Location Card, Web Server FastTab, on the client instance (POS environment) for the Head Office:
- Set the Web Service AuthType field to Basic.
- In the Web Service User Name field, enter the name of the Nav User that you created in the client instance.
- In the Web Service Password field, enter the Web Service Access key that you copied from the User Card in the web service instance.
- Keep the Web Service Domain field blank.