In this article
Open the Cloud Master/Head Office instance
Content of the Configuration Packages
HEADOFFICE Distribution Location
POSMASTER Distribution Location
Retail Setup / Scheduler Setup
To replicate data back and forth from or to the Cloud Master Database, POS Master, or POS devices, the Cloud Master Database must have the necessary data setup:
- Scheduler Jobs
- Subjobs
- Distribution Locations
- Retail Setup
- Web services
To simplify the setup, Configuration Packages are provided with the HCS install package, which can be imported into the Cloud Master Database.
The HCS install package includes the following Configuration Packages:
- Package HC-DISTR-LOC - for the Distribution Locations
- Package HC-SHED-JOBS - for the Scheduler Jobs and Subjobs
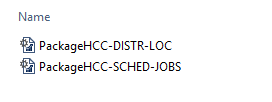
Note: Import and apply the "HCC-DISTR-LOC" package for Distribution Locations first, as the data in the "HCC-SHED-JOBS" package relies on it.
Open the Cloud Master/Head Office instance
Importing the configuration packages into the Cloud Master instance is a prerequisite for the HCS setup. For information on how to import a Configuration package, see Apply Company Configuration Packages.
Content of the Configuration Packages
The following Scheduler Jobs are provided with the HCS install package and cover the master data and replication setup needed in a typical installation.
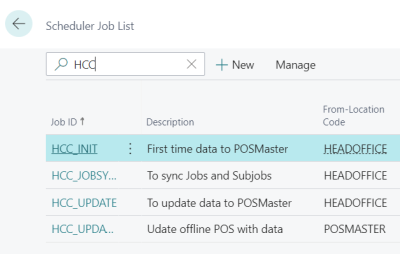
| Job ID | Description |
|---|---|
| HCC_INIT | Replicates all master data from Cloud Master to POS Master. |
| HCC_JOBSYNC | Replicates the replication setup from Cloud Master to POS Master. A job that syncs all relevant data needed to HCS database so that the jobs can run smoothly. Note: This job is created automatically in the POS Master by the HCS install, as soon as the POS Master database has been restored and the service has been started this job is run. |
| HCC_UPDATE | Replicates all master data that has changed since the last run of HCC_UPDATE or HCC_INIT. |
| HCC_UPDATE_TO_POS | A job that replicates all needed data from POS Master to the offline POS or POS Server database. |
Note: Make sure to set up the correct From-Location Code and To-Location in the jobs for proper replication.
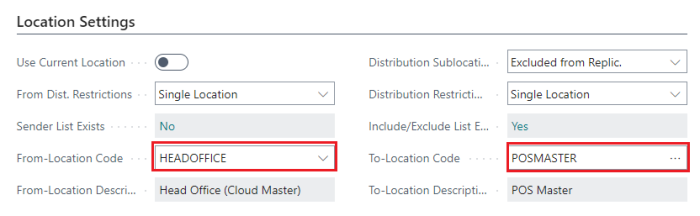
Note: The distribution location names HEADOFFICE and POSMASTER are fixed names within the standard HCS install.
The Cloud Master must have the following distribution locations correctly set up to replicate from Cloud Master to POS Master and from POS Master to offline POSs.
| Code | Description |
|---|---|
| HEADOFFICE | Head Office (Cloud Master) |
| POSMASTER | POS Master |
| DEVICE0001 | Offline POS / Offline POS Server |
Additional Setup
After importing and applying the configuration packages, there are a few settings that you must update in the Distribution Locations imported from the configuration packages and in both the Retail Setup and Scheduler Setup cards.
HEADOFFICE Distribution Location
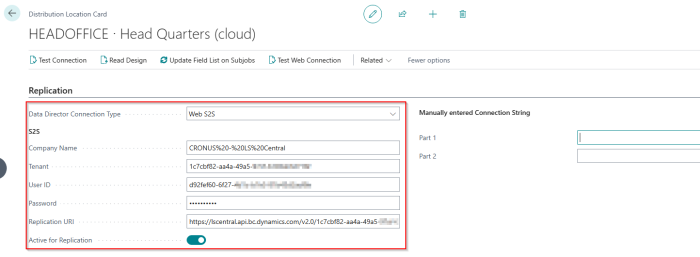
The POSMaster will be using the setup on the Replication tab for the HEADOFFICE Distribution Location, when it needs to connect to head office in SaaS, to push and pull data.
The POSs will be using the setup on the Replication tab for the HEADOFFICE Distribution Location, when they need to connect to the head office in SaaS, for example to send posted transactions.
For example, the POS Master will provide these settings to Data Director, so that Data Director can push/pull data to/from SaaS.
The following fields should be filled in accordingly:
- Data Director Connection Type: Web S2S
- Company Name: Company on the Head Office to replicate the master data from.
- Tenant: The SaaS environment tenant ID.
- User ID: The Entra Application (former Azure Active Directory app) ID.
- Password: The Entra Application client secret.
- Replication URI: The URI for the RetalWebServices endpoint in the LS Central SaaS environment, for example https://api.businesscentral.dynamics.com/v2.0/1c7cbf82-aa4a-49a5-97cf-*********/Production/WS/CRONUS%20-%20LS%20Central/Codeunit/RetailWebServices
- Active for Replication: Enabled.
The Calculated Connection String should be similar to:
id=HEADOFFICE;company=POSMaster;url=https://lscentral.api.bc.dynamics.com/v2.0/1c7cbf82-aa4a-49a5-**********/Production/WS/CRONUS%20-%20LS%20Central/Codeunit/RetailWebServices;clientid=d92fef60-6f27-4d1c-**********;clientsecret=thisisjustadummypassword;tenant=1c7cbf82-aa4a-49a5-97cf-********;|lsws|s2s
Note: Alternatively, you can manually configure the connection string for the Cloud Master by entering values in the Manually Entered Connection String fields on the Distribution Location Card.
The format is as follows:
- Part 1: server=https://lscentral.api.bc.dynamics.com/v2.0/<Tenant>/<Environment Name>/WS/<CompanyName>/Codeunit/RetailWebService
-
Part 2: user=<client id>;password=<client secret>;|lsws|s2s
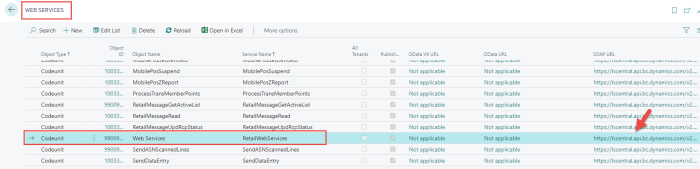
You get the underlined bold part of the connection string from the Web Services page in the Cloud Master tenant, search for Codeunit RetailWebServices, and copy the SOAP URL:
POSMASTER Distribution Location
The POSMaster instance needs to communicate with Data Director to pull and push data from or to SaaS.
To ensure this connection, set up the following on the POSMaster distribution location:
Data Director tab
- Data Director Mode: The default connection method is TCP.
- Distribution Server: This is the IP or host name for the Data Director host. If Data Director is running on the same machine as the POSMaster instance, set this field to localhost.
- Server Port: Leave empty, and the default port for the connection method will be used.
WS Distribution Server tab
From LS Central 16 onwards, there is a Data Director Web Service that will handle the communications from LS Central to Data Director. This web service is running on IIS on the same host as the POSMaster instance or Data Director, on the standard Hybrid Cloud implementation in this guide.
Therefore, you must set up the following:
- Distribution Server URL: This is the URL for the DD Web service running in IIS. For the standard implementation, set it to http://localhost/ddwebservice
- Distribution Server AuthType: The authentication type for DD Web service running in IIS. Set to None for the standard implementation.
Replication tab
This should point to the local POSMaster database, to where the master/setup data being pulled from SaaS is going to be stored.
Set up the following:
- Data Director Connection Type: Set it to Database.
- Company Name: The company name on the POSMaster database to where the master/setup data is going to be replicated. By default is called POSMaster.
- User ID: Enter the SQL database user, if using SQL Server Authentication.
- Password: Enter the SQL database user, if using SQL Server Authentication
Note: Leave these two fields empty, if you are using Windows Authentication.
Check user permissions needed (DD Service or user running IIS Application Pool) when using NT Authentication mode.
- Db Server Name: IP or host name and instance for the SQL Server. For the standard implementation, where SQLExpress is being installed in the same host, just enter localhost\SQLEXPRESS
- Db. Path & Name: The database name. For the standard implementation this should be POSMaster (as the POS Master database has not been set up yet, you must make sure that the Company Name on the Location card is the same as the one you selected for the database in the installation process in step 3).
- Version: Select the relevant version from the list. For the standard implementation, select LSBC (Plugin ID should be ms and Plugin String should be bc), for recent LS Central versions - above LS Central 15.
- Driver Type: Set to SQL
- Net Type: Set to tcp
- Active for Replication: Set to True.
Web Server tab
The Web Server tab for the POSMaster distribution location will not be used, and therefore should be empty.
For more information on distribution location setup, see Distribution Location Setup.
Note: These settings on the POSMASTER and HEADOFFICE should be the same for both SaaS and the POSMaster instance.
Note: Microsoft deprecated Basic Authentication on SaaS. The following instructions use OAuth2 (Service-2-Service) authentication.
For more information on how to setup Service-to-Service (S2S), see S2S Authentication.
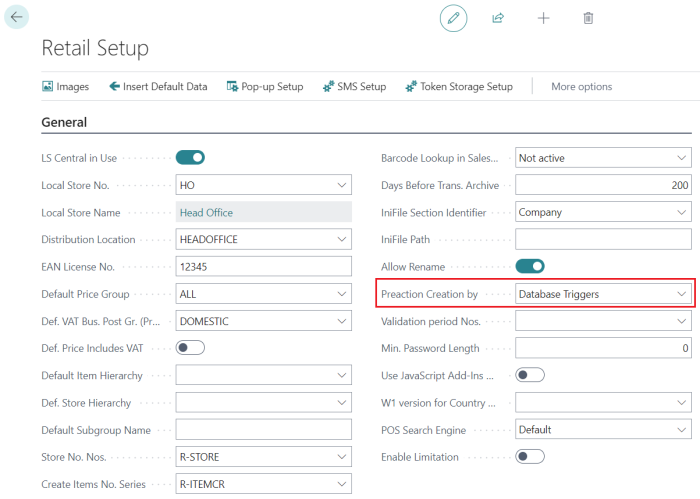
Retail Setup / Scheduler Setup
In the Retail Setup page, you must configure the following:
-
The Preaction Creation by field must have option Database Triggers:
In the Scheduler Setup page, you must configure the following:
-
The Replicate using Preactions check box must be set as active.
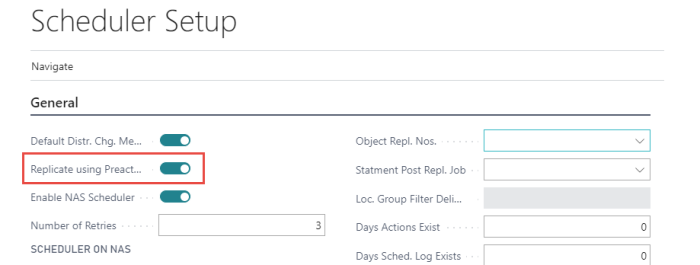
This will ensure that preactions are created with the correct Location Group Filters that will enable replication based on preactions.