In order to use the Hospitality POS on a mobile phone instead of a POS display you must change the POS look and design with the smaller phone display in mind. The phone layout is more compact and the setup process slightly different.
Setup for the terminal
The LS Central Demo Data Company has an example of a setup for using the Hospitality POS on a mobile phone.
This example is set on Terminal P0047 which is working on Store S0005.
- The Interface Profile for this terminal is: #HOSP-PHON
- The Menu Profile for this terminal is: #HOSP-PHON
- The Style Profile for this terminal is the same as for Store S0005 or #ARIES.
Note: This example is designed for use on the phone in portrait mode. You can easily change the layout to landscape mode.
The setup uses a table list functionality which is explained in Working with Dining Table List
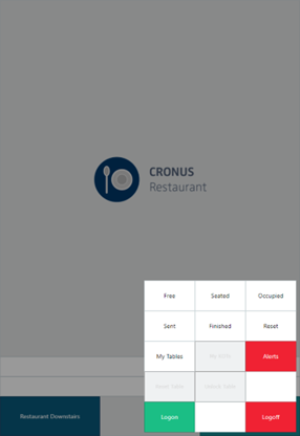
To logon the POS
- Tap the Manage button, then Logon.
- Enter staff ID and password.
Tip: You can enter 501 in the Staff ID field if you do not have a password. In the LS Central Demo Data Company User 501 does not require a password.
- You are now in the Hospitality Prestart window.
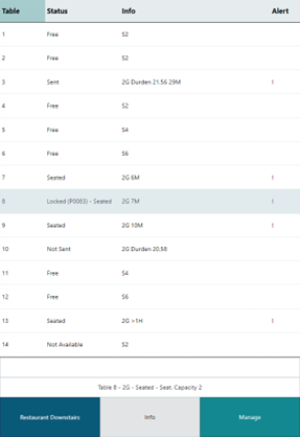
Hospitality Prestart window
All available Hospitality POS options are displayed in the Hospitality Prestart window.
The list in the main part of the window is a list of tables where each line represents one table.
There are three action buttons at the bottom of the window:
- Restaurant Downstairs: Allows the user to switch between hospitality types.
- Info: Displays POS and status information.
- Manage: Displays options for filtering the tables in the Prestart window:
- Free: Filter all tables with status Free.
- Seated: Filter all tables with status Seated.
- Occupied: Filter all tables with status Occupied.
- Sent: Filter all tables with status Sent.
- Finished: Filter all tables with status Finished.
- Reset: Reset the filter.
- My Tables: Filter all tables belonging to the waiter who is logged on.
- My KOTs: Show KOTS belonging to the current user.
- Alerts: Filter all tables with status Alert.
- Reset Table
- Unlock Table
- Logon
- Logoff
To open a table
When users open one table, they get the same options as are in hospitality POS, Seat Guests, Open Table and so on.
Since the phone has a small, much smaller as the standard Hospitatliy POS the options in the POS part are not as many as in standard Hospitality POS.
The process to enter items into the table is in two steps
- First step: displays the journal and actions buttons
- Second step: use button Menu to open the menu part to sell items
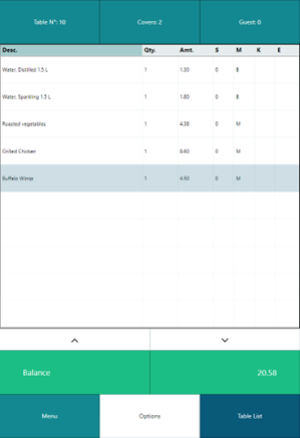
To open the POS for a table / to go into the first step of the process
Be in the table list view
-
For a new table select the table and use option Seat Guests
-
For a table that has been seated, select the table and use options Open Table
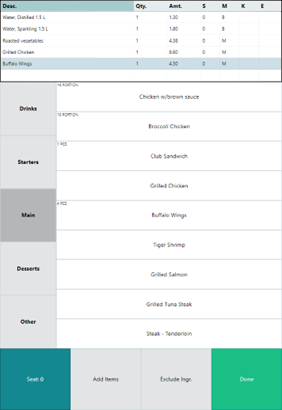
Selling items into a table / to go into the second step of the process
-
Be in the first step of the process.
-
Use button Menu
-
Opens a panel where the user can add the items on the table
-
Top part displays the last lines for the table‘s journal
-
Middle part includes the menu part
-
Lower part displays different actions
-
-
Closing the menu part in the POS
-
Going from second step to first step
-
Use button Done
-
This closes the menu part and goes back to POS part
Sending order to the kitchen
-
Be in the first step in the process
-
Use button Options, this opens a menu with few options
-
Use option To Kitchen to send the order to the kitchen
Close a table to get into the table list layout
When in first step:
-
Use option Table list to close the POS part
When in second step ( in the menu part)
-
Use option Done to close the menu part
-
Use option Table List to close the POS part
Example: To logon into the hospitality POS on a phone
Example: Hospitality pre-start window / the list of tables
Example: POS first step
Example: POS second step