In this article
How to: Define a search index for a table
How to: Add fields to a search index
How to: Add related data to a search (nested relationship)
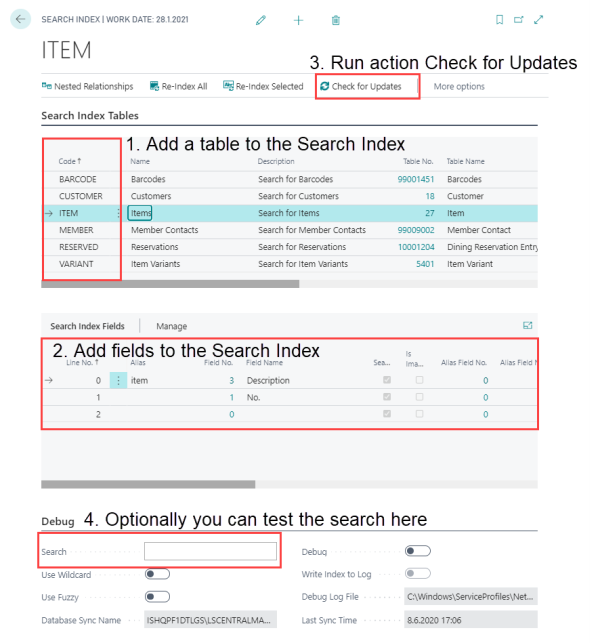
The search scope is defined on the Search Index page, where multiple tables and fields are added for search capabilities. Related data in nested tables can also be hooked to search entries for a broader search scope.

Behind the POS Search is a search engine that needs to be fed with data that should be available for search. This process is called indexing and is handled in background processes in order to appear seamless to the user.
The search engine resides on the same machine as the service tier and is created automatically. It is maintained through update actions that are created in the Search Index Action (10000769) table.
POS Search uses Lucene.Net.
How to: Define a search index for a table
- Open the Search Index page, and click Edit List.
- Select a new line on the Search Tables FastTab.
- Give the entry an ID, Title, and select the Table No. of the table to be searchable.
- Set the Title Format, which is the format of the search result that appears to the user. The format string should contain one or more Field Aliases in curly braces. For example,
{item} @ {price} results in
Milk 1 Liter @ 1,144
Optionally, you can select to
Select a Type Image URI to set an image to represent search results generated from the specified table. The URIs supported are lsmedia://, http:// and file://.
Search table properties
| Property | Description |
|---|---|
| Code | Sets a unique identifier for the search. |
| Name | Defines the search name, which is used as the caption. |
| Description | Include an optional description of the search. This description is for internal purposes only and is not visible to the end user. A short description of the search’s purpose makes it easier to maintain the application. |
| Table No. | Unique identifier for the table associated with the search. |
| Title Format | Title's format that appears on the search results. |
| Description Format | Description's format that appear on the search results. |
| Use Retail Image | Associate the first linked Retail Image to entry. |
| Boost | Sets the boost or gives this search more importance or less importance (default value is 1). |
| Type Image URI | Set an image for this search that appears for every search result of this type. |
How to: Add fields to a search index
Adding a field to the search will make the field searchable, meaning the field values will be fed to the search engine.
On the POS Search Card:
- Select a Search Index Table entry to add fields to.
- Select a new line on the Search Index Fields FastTab.
- Select a Field No. of the field to be searchable.
The field specified can be of any Business Central type, most types are handled as Text or as the FORMAT() equivalent. With the exception for number types, which are stored as numbers, allowing range queries (as described in Search Syntax) and Date/DateTime/Time which is always stored as a string in the standard XML format.
Giving a field an Alias has two functions:
- To create a Title Format for a Search Entry.
- For example, if one field is given the alias item and another field is given the alias price, then the search result Title Format can be defined as
{item} costs {price}
and then every search result will have the title formatted accordingly. Where the value of the item field will replace {item} and the value of the price field will replace {price}.
- For example, allowing the user to enter a search query such as:
item:milk price:{1 TO 100}
The same alias can be defined for multiple fields, which will add the content together but not overwriting it. Avoid using the same alias for multiple fields with different data types, which might give undesired results.
Search Field Properties
| Property | Description |
|---|---|
| Line No. | Defines the line number. |
| Alias | Defines the field alias or name. |
| Field No. | Associates the field with selected search and makes it searchable. |
| Searchable | Determines if the field should be searchable. Should be used with Title Format on the search. |
| Is Image URI | Use the value of the field as an image representing the search document. This must be a valid and supported URI (http://, lsmedia://, file://). |
| Alias Field No. | Use the value in Alias Field No. as an alias for this field. |
| Pre-Processing Codeunit | Process this field’s value with a codeunit. |
| Formatting | Formats the field’s value according to selected option. |
| Std. Formatting Text | Format text passed to FORMAT() |
| Boost | Sets the boost or gives this field more importance or less importance (default value is 1). |
How to: Add related data to a search (nested relationship)
To search in tables related to the main search table, you create a Nested Relationship:
- Open the Search Index page.
- Select a search index table entry to modify.
- Click Actions - Nested Relationships. A new Search Index page opens with only entries related to the selected/parent search index table.
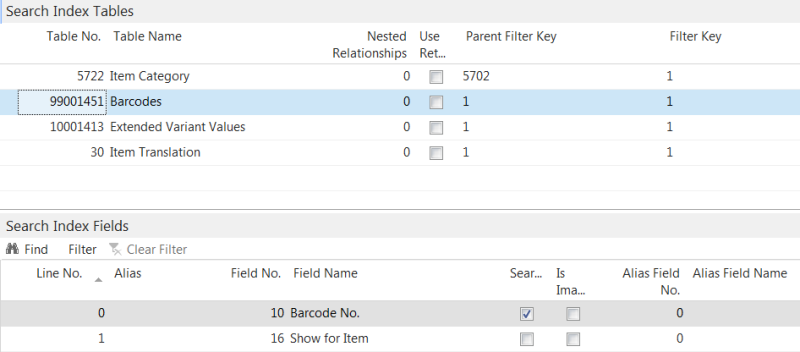
- Select a new line on the Search Index Tables FastTab, and select the related table (Table No.).
- In the Parent Filter Key field, list all key field numbers (separated with a comma (,) on the parent table, that connect to the nested table.
- In the Filter Key field, list all the key fields on the nested table that connects the parent table. The number of fields in Parent Filter Key and Filter Keys must be equal and must match, respectively.
- For example, to search for a barcode and get the related item as a result, define the Item (27) table as a parent search table, then the Barcodes (99001451) table as a nested relationship then set:
Parent Filter Key: 1 (Field 1 "No." in the Item table)
Filter Key: 1 (Field 1 "Item No." in the Barcodes table)
- For example, to search for a barcode and get the related item as a result, define the Item (27) table as a parent search table, then the Barcodes (99001451) table as a nested relationship then set:
- Define fields for the nested table in the Search Fields FastTab as described previously in How to: Add fields to a search index.

Note: Nested relationships can be defined recursively.
Indexing in more detail
The Search Index can be set up in two ways, with one global search engine (located in the head office, for example) that serves all POSs, or with one search engine for each service tier (distributed search engines).
The indexing process is cumulative, initially every table defined as searchable must be scanned and fed to the search engine. Afterwards, when an entry in any of the search tables is changed it is updated simultaneously in the index, but only for the search engine connected to the current service tier. Other search engines must be updated with the help of the POS Search Action table, described below.
- Initial Index:
- Initially a process loops through every data entry in every table that is defined on the POS Search page, and feeds its data into the search engine.
- Data Entries Updated:
- When a table entry is added, changed, or deleted the index is updated automatically for tables that are managed by the Action Management codeunit (for replication). Tables managed by the Action Management do have a function called CreateAction(Type: Integer) in their update triggers (OnInsert, OnModify, OnDelete and OnRename).
- To automatically update the index in other tables, you must add the following code to the OnInsert, OnModify, OnDelete, and OnRename triggers:
OnInsert() UpdateIndex(0); OnModify() UpdateIndex(1); OnDelete() UpdateIndex(2); OnRename() UpdateIndex(3); LOCAL UpdateIndex(Type : Integer) //Type: 0 = INSERT, 1 = MODIFY, 2 = DELETE, 3 = RENAME RecRef.GETTABLE(Rec); xRecRef.GETTABLE(xRec); POSSearch.UpdateIndex(RecRef, xRecRef, Type); - An update action is created in the table POS Search Action (10000769) for every entry changed.
- Search Definition Changed:
- The index is updated if a search definition is added, changed or deleted.
- An update action is created in the table POS Search Action (10000769) for the change.
Update actions are created for every change made in the database, if that change involves a searchable table. These actions are created to keep distributed search engines up-to-date. A background process is run every time a POS is started which checks for any updates in the POS Search Action table and updates the index accordingly.
- Data Updated on a Different Service Tier with the Same Database:
- Each service tier checks for updates in the POS Search Action (10000769) when a POS is started.
- Data Replicated from a Different Database :
- When the data is maintained on a database in HO and is replicated down to the POS’s, one must also replicate the POS Search Action table, in order to keep the search index up-to-date on the POSs.