Before you can start replicating data from your LS Central in-cloud instance to LS Insight in Azure, there are a few things you need to set up and check if they are in order in LS Central. If you are replicating from more than one company in LS Central, you need to follow these steps for all companies. Each company must have their own web service.
Publish Retail web services
- In LS Central SaaS, login as admin and navigate to Web Services.
- Search for Retail -> RetailWebServices (99009510), which should be displayed in the list.
- Note: If you cannot find this service in the list, you must add it: press the New action, and find the code unit (99009510). Be sure to use the name RetailWebServices.
- If you just added the RetailWebServices or if it is not published, you need to publish it by doing the following:
- Click the Edit List action in the top menu: the list becomes editable.
- Select the Publish check box in the line.
- Click the Edit List action again in the top menu: the list stops being editable.
- In the list, locate the SOAP URL field for RetailWebServices, and copy the URL to Notepad for later use.
- Also search for GetActionsFromRemoteDB (99008933) and GetReplCountersFromRemoteDB (99008931), and add and publish them, if they do not exist already.
Register app in Azure
Follow setup instructions for Service-to-Service OAuth App registration in Azure.
Create the Azure Active Directory Application account
- Log into LS Central using the same account that you used when you logged into the Azure portal earlier. In this example this is admin@DEVUKLSInsightTeam.onmicrosoft.com
- In LS Central, click the
 icon, and enter Azure Active Directory Applications (or just AAD), and select the relevant link.
 - Click the New action to add a new record.
- In the Azure Active Directory Application Card, fill in the Client ID that you copied in the setup or an ID that you received from the organization that owns the external application. The curly brackets will be added automatically.
- Enter a description (S2S_AppUser).
- Change the State to Enabled. When you do that the user will be created, and a User ID and User Name added to the card.
- Next configure the permissions. The User Group(D365 BUS PREMIUM) and User Permission Sets(SUPER_S2S) need to be added like in the image below. Adding the user group permission will automatically add a permission set as well. Since you cannot apply SUPER permission set directly on a user, you need to copy that permission to create the SUPER_S2S permission set by following these steps:
- Click the
 icon, enter Permission Sets, and select the relevant link.
 - Select the SUPER permission set from the list, and click the Copy Permission Set action in the top menu.
- Enter a name for the new permission set, SUPER_S2S, and click OK.
- Set the new permission set on the user in the Azure Active Directory Application Card.

- Click the
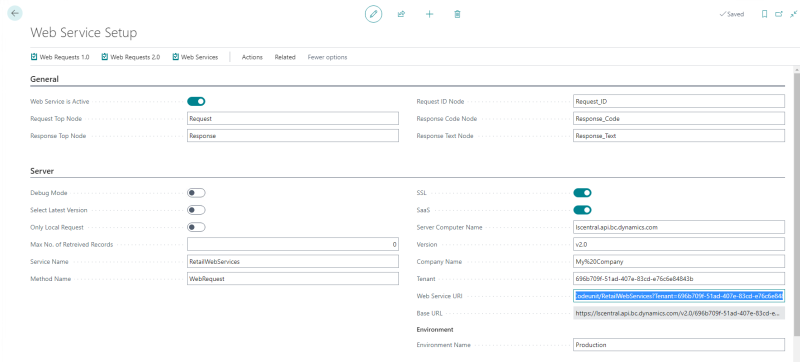
Web service setup
- Navigate to the Web Service Setup page in LS Central.
- In the General FastTab:
- Turn on the Web Service is Active check box.
- In the Server FastTab, fill in the fields like this:
- Enable the SSL switch
- Enable the SaaS switch
- Server Computer Name: lscentral.api.bc.dynamics.com
- Version: v2.0
- Company Name: Name of the company you are replicating from in LS Central SaaS. This should be the company you see, if you click the cogwheel icon and go to My Settings.
Example: My%20Company - Tenant: Your tenantID. This is visible in the address bar of your browser and was also visible in the App registration overview.
Example: 696b709f-51ad-407e-83cd-e76c6e84843b - Web Service URI: Generated automatically by the system from the parameters you have inserted.
Example: https://lscentral.api.bc.dynamics.com/v2.0/696b709f-51ad-407e-83cd-e76c6e84843b/Production/WS/My%20Company/Codeunit/RetailWebServices?Tenant=696b709f-51ad-407e-83cd-e76c6e84843b - Base URL: Generated automatically by the system from the parameters you have inserted.
Example: https://lscentral.api.bc.dynamics.com/v2.0/696b709f-51ad-407e-83cd-e76c6e84843b/Production/WS/My%20Company?Tenant=696b709f-51ad-407e-83cd-e76c6e84843b - Environment Name: This is the name of your LS Central SaaS environment. In this example the name Production is used.
- In the Logs FastTab, you can turn on logging for the web service, if you wish. This can help troubleshoot any errors that may occur in the web services.
- In the Client Credentials FastTab, fill in these fields:
- Enable the Override Client Credentials switch.
- Http Authentication type: S2S.
- Client ID: The Application (Client) ID that you saved earlier.
Example: 3bc124d5-98f2-4437-8834-2d9172e4b802 - Client Secret: Value from the Client secret you created and saved in the App registration.
Example: C_Y8Q~a9vUuKcrcQh9Zui3jdCUO_MacFMP_JOb12 - Navigate to a different field to save your changes.
- You can now test the connection you just created by clicking Actions in the top menu and selecting Function - Test Web Connection
- This should result in a message stating that the connection was tested successfully in x.x seconds.
- If the test connection fails, you need to review the parameters in the fields above.

Publish and subscribe to web services
- Navigate to the Web Requests 2.0 page in LS Central.
- Check that the Base URL matches the one you have set up in the Web Service Setup page (here it ends with tenant ID).
- Click the Publisher action. This will publish all web services.
- Click the Subscriber action. This will create a subscription to all web services.
Preaction setup
Before you start to replicate using preactions, the LS Central system must be set up to create those actions when things are added and changed. This is done by adding the Preaction Creation setup.
Retail setup
- Navigate to the Retail Setup page in LS Central.
- In the General FastTab:
- Make sure the Preaction Creation by field is set to Database Triggers.
- If it is not, set the field to Database Triggers, and then navigate to a different field to save the page.
- Click the Insert Default Data action.
- The LS Retail - Insert Default Data page opens. Click the Clear All to deselect everything.
- Enable the Override Current Settings and Preaction Creation Setup check boxes in the list.
- Click the Insert action.
- This will insert the data needed to create preactions.
- If you get a question about there being more preaction data than the default and whether you want to delete that, you can just select no to keep everything.
Scheduler setup
- Navigate to the Scheduler Setup page in LS Central.
- In the General FastTab:
- Enable the Replicate using Preactions check box.
- If the check box is not enabled, turn it on and then navigate to a different field to save the card.
The cloud setup is now done and you can move on to what needs to be done on the Scheduler server.