Now that you have set up your LS Central Scheduler instance and downloaded the LS Insight product package, you need to set LS Central up to control the replication. The web service setup points to the web service you just set up in your LS Central in-cloud, but the jobs and distribution locations will be set up in this on-premises instance of LS Central.
Note: If you have set up web service for more than one company in LS Central in-cloud, you must also have more than one company on the Scheduler server. You can just copy the company that exists in LS Central. The names of the companies on the Scheduler server do not matter, but it is good practice to make them the same as in the cloud.
Web service setup on Scheduler
Once you have set up the LS Central instance on-premises on the same machine where the Data Director is running, you need to set up the web service to match the LS Central SaaS instance web service setup.
As with the SaaS setup, follow these steps and duplicate the setup you did in your cloud LS Central:
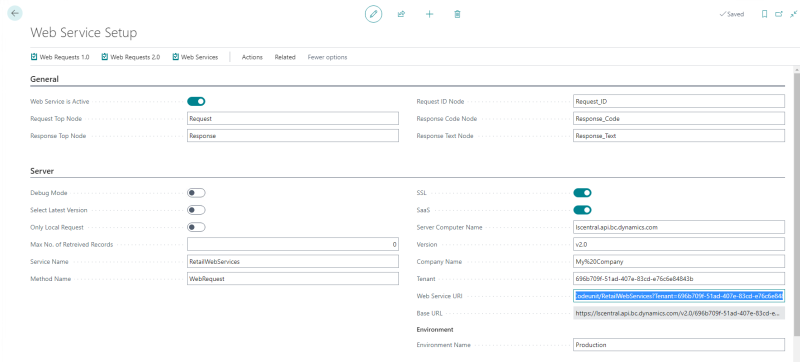
- Navigate to the Web Service Setup page in LS Central.
- In the General FastTab:
- Enable the Web Service is Active switch.
- In the Server FastTab, fill in these fields:
- Enable the SSL switch.
- Enable the SaaS switch.
- Server Computer Name: lscentral.api.bc.dynamics.com
- Version: v2.0
- Company Name: Name of the company you are replicating from in LS Central SaaS. This should be the company you see, if you click the cogwheel icon and go to My Settings. Example: My%20Company
- Tenant: Your tenant ID. This is visible in the address bar of your browser and was also visible in the App registration overview.
Example: 696b709f-51ad-407e-83cd-e76c6e84843b - Web Service URI: Generated automatically by the system from the parameters you have inserted.
Example: https://lscentral.api.bc.dynamics.com/v2.0/696b709f-51ad-407e-83cd-e76c6e84843b/Production/WS/My%20Company/Codeunit/RetailWebServices?Tenant=696b709f-51ad-407e-83cd-e76c6e84843b - Base URL: Generated automatically by the system from the parameters you have inserted.
Example: https://lscentral.api.bc.dynamics.com/v2.0/696b709f-51ad-407e-83cd-e76c6e84843b/Production/WS/My%20Company?Tenant=696b709f-51ad-407e-83cd-e76c6e84843b - Environment: This is the name of your LS Central SaaS environment.
Example: Production.
-
In the Logs FastTab you can turn on logging for the web service, if you want to. This can help you troubleshoot any errors that may occur in the web services.
- In the Client Credentials FastTab fill in these fields:
- Enable the Override Client Credentials switch.
- Http Authentication type: S2S.
- Client ID: The application (Client) ID that you saved earlier.
Example: 3bc124d5-98f2-4437-8834-2d9172e4b802 - Client Secret: Value from the Client secret that you created and saved in the App registration.
Example: C_Y8Q~a9vUuKcrcQh9Zui3jdCUO_MacFMP_JOb12 - Navigate to a different field to save your changes.
- You can now test the connection you just created by clicking Actions in the top menu and selecting Function - Test Web Connection.
- This should result in a message stating that the connection was tested successfully in an X number of seconds.
- If test connection fails, you need to review the parameters in the fields above.

Publish and subscribe to Web services
- Navigate to the Web Requests 2.0 page in LS Central.
- Check that the Base URL matches the one you set up in the Web Service Setup (here the URL ends with the Company name).
- Click the Publisher action. This will publish all web services.
- Click the Subscriber action. This will subscribe to all web services.
Distribution location setup
Next, you must set up the distribution locations for LS Central in-cloud and LS Insight in Azure.
LS Central in-cloud distribution location
- Navigate to the Distribution Location List in LS Central on the Scheduler server.
- Click the New action to create a new distribution location .
- In the General FastTab, enter these values:
- Code: LSCCLOUD
A confirmation message appears, click Yes. - Description: LS Central in cloud.
Leave other fields blank or unchanged.
- Code: LSCCLOUD
- In the Data Director FastTab, enter these values:
- Data Director mode: TCP
- Distribution Server: Computer name of the machine where Data Director is running.
Example: DHOSRVIN03Tip: You can find this name by pressing the Windows key + Pause/Break on this machine, or by opening the Configuration tool. The name is the Host name displayed to the left.
Leave other fields blank or unchanged.
- In the WS Distribution Server FastTab:
- Distribution Server URL: http://<DistributionServer>/DDWebservice
- Distribution Server Auth Type: Select None
Leave other fields blank or unchanged.
- In the Replication FastTab:
- Company name: Name of company you are replicating from in SaaS.
Example: My%20Company - UserID: The Application (client) ID that you saved earlier.
Example: 3bc124d5-98f2-4437-8834-2d9172e4b802 - Password: The value from the Client secret you created and saved in the App registration.
Example: C_Y8Q~a9vUuKcrcQh9Zui3jdCUO_MacFMP_JOb12 - Db Server Name: Web service URI without Tenant ID.
Example: https://lscentral.api.bc.dynamics.com/v2.0/696b709f-51ad-407e-83cd-e76c6e84843b/Production/WS/My%20Company/Codeunit/RetailWebServices
You can get the path by filling out the web server information in the Web server fast tab and copy this value from the Web service URI field. - Db. Path & Name: Tenant ID from App registration.
Example: 696b709f-51ad-407e-83cd-e76c6e84843b - Version: LSWS-S2S
If this version does not exist in the list, you must create it:
- Click the
 icon, enter Dist. Location Versions, and select the relevant link.
 - Click the New action, and enter the following information in the fields:
- ID: LSWS-S2S
- Description: LS Central SaaS oAuth
- Plugin ID: lsws
- Plugin String: s2s
- Click the
- Driver Type: SQL
- Net Type: tcp
- Enable the Active for Replication switch.
Leave other fields blank or unchanged (also Part 1 and Part 2)

- Company name: Name of company you are replicating from in SaaS.
- The Connection string is displayed in the Calculated Connection String FastTab.
- Click the Test Connection action:
- A message box asks if you want to test the connection, click Yes.
- If the connection is successful, a message box is displayed with the time it took to test and you can continue to the next step and move on to step 9.
- If the connection is not successful, an error is displayed and you need to check the parameters you used against the App registration. If it still is not successful, you can construct the manual connections strings from the information you collected from the App registration without removing the information from the other fields. The format of a manually entered Connection string is explained below.
- Manually entered connection strings
- Part 1: Enter a string using the following format: server=https://lscentral.api.bc.dynamics.com/v2.0/<TenantID>/<EnvironmentName>/WS/<CompanyNameWith%20insteadofspace>/Codeunit/RetailWebServices
Example: server=https://lscentral.api.bc.dynamics.com/v2.0/696b709f-51ad-407e-83cd-e76c6e84843b/Production/WS/My%20Company/Codeunit/RetailWebServices - Part 2: Enter a string using the following format: user=<Application(client)ID>;password=<ClientSecretValue>;Database=<TenantID>;
Example: user=3bc124d5-98f2-4437-8834-2d9172e4b802;password=C_Y8Q~a9vUuKcrcQh9Zui3jdCUO_MacFMP_JOb23;Database=696b709f-51ad-407e-83cd-e76c6e84843b;
- Part 1: Enter a string using the following format: server=https://lscentral.api.bc.dynamics.com/v2.0/<TenantID>/<EnvironmentName>/WS/<CompanyNameWith%20insteadofspace>/Codeunit/RetailWebServices
- In the Web Server FastTab, enter these values:
- Enable the Web SSL switch.
- Enable the Web Server SaaS switch.
- Web Server Computer Name: lscentral.api.bc.dynamics.com
- Web Service Company Name: Company name
Example: My%20Company - Web Server Version: v2.0
- Web Server Tenant: Tenant ID
- Example: 696b709f-51ad-407e-83cd-e76c6e84843b
- Web Server Environment Name: The name of the LS Central SaaS environment.
Example: Production - Web service URI: Automatically constructed from the fields you just entered.
Example: https://lscentral.api.bc.dynamics.com/v2.0/696b709f-51ad-407e-83cd-e76c6e55543b/Production/WS/My%20Company/Codeunit/RetailWebServices - Enable the Web Override Credentials switch.
- Web Server AuthType: S2S
- Web Service User Name: Application (Client) ID
Example: 3bc124d5-98f2-4437-8834-2d9172e4b802 - Web Service Password: Client secret value
Example: C_Y8Q~a9vUuKcrcQh9Zui3jdCUO_MacFMP_JOb23
- Click the Test Web Connection action:
- A message box asks if you want to test connection, click Yes.
- If the connection is successful, a message box is displayed with the time it took to test.
- If the connection is not successful, an error is displayed.
Both connections should test successfully before you continue. If you get errors, it is most likely that the connection string is not correctly assembled, so check that your string has the correct Company, TenantID, Application(Client)ID and ClientSecret, and that you have entered the correct information in the Web Server FastTab. The error message should also give an indication of what is wrong.
LS Insight in Azure distribution location
At this time you can only create this location and use it in your job setup, but you cannot complete it until LS Insight has been set up in Azure.
- Navigate to the Distribution Location List in LS Central on the Scheduler server.
- Click the New action to create a new distribution location.
- In the General FastTab, enter these values:
- Code: LSINSIGHT
A message appears, click Yes. - Description:LS Insight in Azure
Leave other fields blank or unchanged.
- Code: LSINSIGHT
- In the Data Director FastTab, enter these values:
- Data Director Mode: TCP
- Distribution Server: The computer name of the machine where Data Director is running.
Example: ISHQPF3M6CVR
Leave other fields blank or unchanged.
- In the WS Distribution Server FastTab, enter this value:
- Distribution Server URL: http://<DistributionServer>/DDWebservice
Leave other fields blank or unchanged.
- You will fill out the Replication FastTab later.
- No changes in the Web Server FastTab.
- You will not be able to test connections at this point since the Replication information has not yet been filled out. This will be discussed later in the process.
Tip: You can find this name by pressing the Windows key + Pause/Break on this machine, or by opening the Configuration tool. The name is the Host name displayed to the left.
Scheduler job setup
You are now ready to set up the Scheduler jobs.
Import Scheduler jobs
In the product package that you downloaded, you will find the Scheduler Job Header.xml file. This file includes all the Scheduler jobs needed to move data from LS Central in cloud to LS Insight in Azure. The first thing you need to do is to import its content to your LS Central on the Scheduler server:
- Navigate to the LS Import Export WS page in LS Central on the Scheduler server.
- Select the Scheduler Job Header line from the list.
- Click the Process action, and then click Import.
- Browse to the file in the Base folder, and click OK.
- When asked, if you want to overwrite existing records, select No (you are not reusing any existing jobs).
- When the Import/Export data utility - confirm window is displayed, click OK.
- The import will now run, and when it is finished it should display Import Finished 94 records in 8 tables. Click OK.
- Navigate back to the Scheduler Job List, and confirm that the INS jobs have been imported. There should be four new jobs:
- LS Insight Action Preload (INS_ACTIONPRELOAD)
- LS Insight Action jobs (INS_ACTIONS)
- LS Insight Normal with counter (INS_NORMAL_COUNT)
- LS Insight Normal Full Load (INS_NORMAL_FULL)
All jobs should have the distribution locations already set to the locations you created earlier:
- From-Location code: LSCCLOUD
- To-Location code: LSINSIGHT
Add receiver group to jobs
Open each of the new jobs, and follow these steps to check if the job has a Receiver group and add one if it is missing.
- Click the Related action, and then click Job - Receiver Groups.
- If there is no store group visible in the list, add the ALL group and navigate away from the field to save.
- Close the Job Receiver Groups page.
Note: Remember to repeat this for all four imported jobs.
This is all the setup you will do for now. Once you have set up LS Insight, you will come back to LS Central on the Scheduler server to schedule and run the jobs.